
Eighty percent of social video views in 2026 happen with the sound off. People scroll Instagram during meetings, watch YouTube on the train, and burn through TikTok at 2 a.m. while their partner sleeps next to them. If your video doesn't have captions, most of your audience isn't hearing a word you're saying.
YouTube gives every creator auto-generated captions for free. That sounds like a win. Until you actually read them. Names get butchered. Technical terms turn into gibberish. Entire sentences collapse into word salad because the speech recognition couldn't handle an accent or a fast talker.
The real fix takes under five minutes, and you don't need to type a single word.
Why your YouTube captions matter more than you think
Before getting into the how, let's talk about why captions are no longer optional for serious creators.
Accessibility is a requirement, not a nice-to-have
The World Health Organization puts the number at 466 million people worldwide with disabling hearing loss. WCAG 2.1 Level AA, the web accessibility standard that sets the bar for digital content compliance, requires captions for all pre-recorded video. The April 2026 compliance deadline pushed universities, government agencies, and enterprise training teams to prioritize captioning across their entire video libraries. If your content lands in front of a viewer who relies on captions, an un-captioned video isn't frustrating. It's unusable.
Captions are a search ranking signal
YouTube indexes the text of your captions and uses it to understand what your video is about. Accurate captions with proper names, technical vocabulary, and natural sentence flow rank better than auto-generated gibberish. A Discovery Digital Networks study found that captioned videos see a 13.5 percent increase in views compared to the same videos without captions. That's free traffic you're leaving on the table.
YouTube indexes your caption text for search. Accurate captions with proper names and technical vocabulary rank better.
Viewers stay longer when captions are on
Captioned videos consistently show 40 percent higher completion rates. The reason is simple: reading along keeps attention locked. In noisy environments like coffee shops, airports, and shared offices, captions are the difference between someone watching your entire video and bailing after 30 seconds. And when you offer captions in multiple languages, you open your content to a global audience.
The three ways to add captions to a YouTube video
There are exactly three ways to caption a YouTube video. Two of them have serious drawbacks. One is the professional standard. And it's faster than the "free" option.
Method 1: YouTube auto-captions
YouTube generates these automatically after you upload. They cost nothing and require zero effort.
The catch? Accuracy hovers around 70 to 80 percent in ideal conditions: clear speech, native English speaker, no background noise. Add an accent, some technical vocabulary, or two people talking over each other, and that number craters fast. YouTube's system doesn't add speaker labels, so dialogue from multiple people runs together into one unbroken paragraph. Proper names get mangled. Industry terms become nonsense words.
Auto-captions work fine for casual vlogs and unlisted test uploads. For anything you expect people to take seriously, they're a liability.
Method 2: Type it yourself
You can type your transcript manually and upload it to YouTube with timestamps. It's 100 percent accurate because you control every word.
A 45-minute video will cost you about three to four hours of typing and timestamp formatting. Repeat that every time you publish. For a weekly podcast or YouTube channel, manual captioning quickly becomes a part-time job nobody asked for. Use this method for short videos under two minutes, or for time-sensitive content where 100 percent accuracy is non-negotiable. Think a product launch or an apology video.
Method 3: Upload an SRT file (the professional standard)
This is the professional standard. SRT is the universal caption file format. Every video platform supports it, and it includes precise timestamps, text, and optional speaker labels.
Until recently, getting an SRT file meant either paying a human transcription service (slow and expensive) or using a transcription tool that required you to download the video, upload it, wait, and then export. Multiple steps, multiple tools, multiple headaches.
DaDaScribe changes that equation. You paste a YouTube URL. Two minutes later, you download an SRT file. That's the whole workflow.
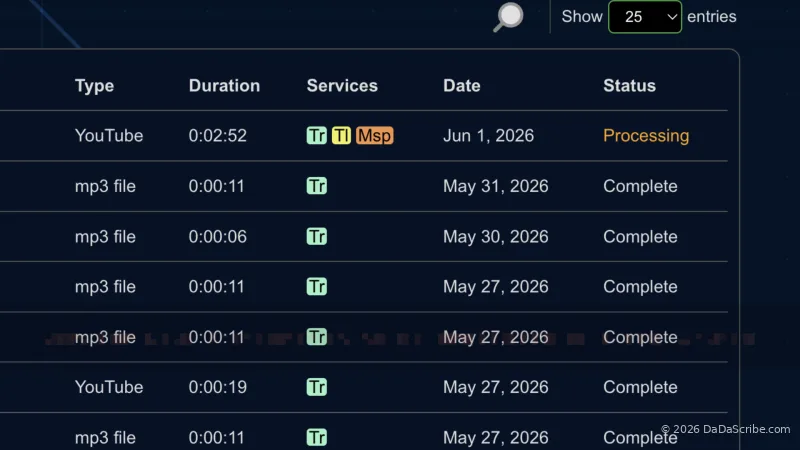
Paste a YouTube URL. Two minutes later, download an SRT file. No downloads, no uploads, no typing.
Step-by-step: DaDaScribe YouTube to SRT in under 5 minutes
Here's the exact workflow, end to end.
Step 1: Copy your YouTube URL
Any public or unlisted YouTube video works. DaDaScribe pulls the audio directly from YouTube's servers. You never download the video file. This alone saves you the bandwidth, storage, and file conversion steps that most transcription tools require.
Step 2: Paste the URL into DaDaScribe
Start from dadascribe.com. Click on the YouTube button, paste the link to your video, define the number of speakers, select the source and destination languages, and you are done. Or you can use the full-fast form to make it even simpler.
That's it. No file uploads. No format conversions. No desktop app to install. DaDaScribe runs entirely in your browser and processes audio in the cloud.
Step 3: Wait about two minutes
DaDaScribe doesn't just throw raw audio at a speech recognition model. The pre-processing pipeline runs first: noise reduction cleans up background hum and room tone, level normalization evens out volume spikes, voice isolation pulls the speaker forward in the mix, and a proprietary processing pass optimizes the signal for a powerful AI-powered accurate transcription. We covered the full pipeline in detail in our guide to fixing noisy interview transcripts.
The result is cleaner input audio, which means fewer transcription errors on output. A 10-minute YouTube video typically processes in about two minutes. Speed scales roughly linearly. A one-hour podcast episode finishes in about 11 minutes.
Step 4: Download your SRT file
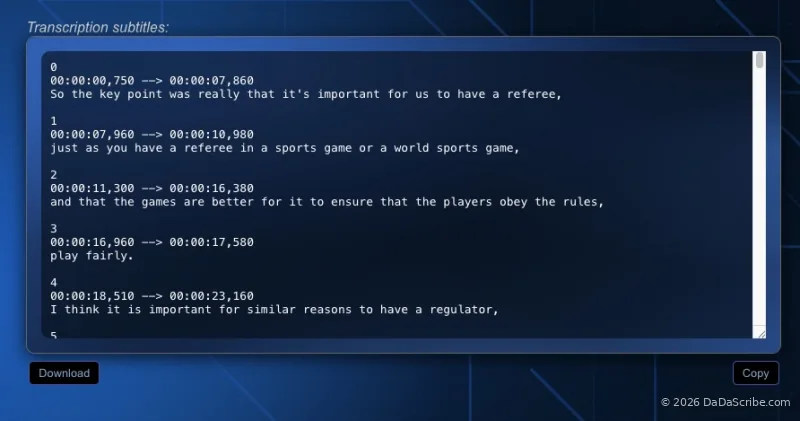
Once processing completes, you'll see the full transcript in your browser. DaDaScribe also generates:
- An SRT file with timestamps and captions, ready for YouTube
- A speaker-labeled transcript if multiple people were speaking
- A plain text transcript for show notes, blog posts, or SEO pages
You can review the transcript and make spot edits before downloading, though you probably won't need to.
Step 5: Upload to YouTube Studio
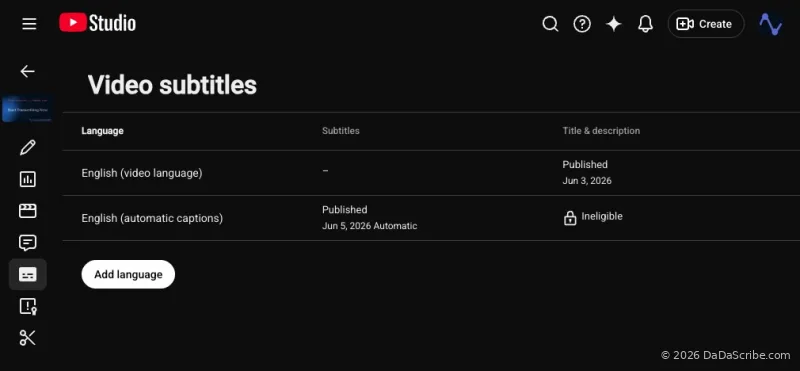
Open YouTube Studio for your video. Go to Subtitles → Add Language → select the language → Upload file. Choose your SRT file. Click Publish.
The timestamps auto-align with YouTube's player. No manual syncing. No formatting cleanup. It just works.
Bonus: Add captions in multiple languages
DaDaScribe translates your transcript into up to 120 languages in a single job. You get a separate SRT file for each language. Upload all of them to YouTube Studio under their respective language tracks, and your video is now watchable, with accurate captions, by audiences who don't speak your language.
This is the feature that transforms a YouTube channel from local to global. A video in English with Spanish, French, German, and Japanese captions reaches audiences that YouTube's auto-captions can't touch.
Real demo: how DaDaScribe handles a real-world interview
To see the difference in practice, let's look at a real example from DaDaScribe's demo library.
Video: Elon Musk CNBC interview
Length: 5 minutes, 22 seconds
DaDaScribe processing time: 2 minute, 33 seconds
Output: ~950-word transcript with speaker labels, plus SRT file for English, Spanish, French, Portuguese, and Chinese
Now look at what YouTube's auto-captions do to the same video. The system correctly transcribes simple sentences but mangles technical terms. The auto-captions also run multi-sentence answers into single block paragraphs with no punctuation breaks, no speaker labels, and no formatting.
DaDaScribe's SRT output preserves all of it: technical vocabulary, speaker breaks, proper punctuation, structured timestamps. The difference isn't subtle. It's the gap between a transcript you'd publish and one you'd apologize for.
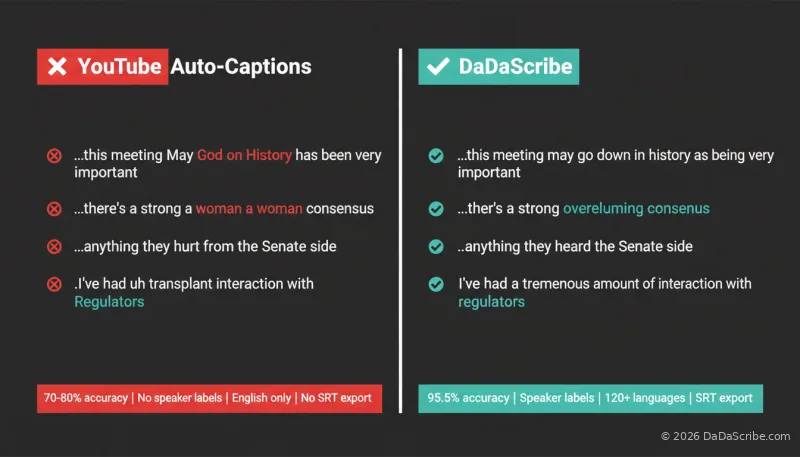
The gap isn't subtle. It's the difference between a transcript you'd publish and one you'd apologize for.
YouTube auto-captions vs DaDaScribe: the full comparison
Here's the side-by-side breakdown:
| Feature | YouTube Auto-Captions | DaDaScribe |
|---|---|---|
| Accuracy | 70-80% (drops to ~50% with accents or noise) | 95.5% on regular speech |
| Speed (10-min video) | 15-30 minutes | ~2 minutes |
| Speaker labels | No | Yes |
| Punctuation and formatting | Minimal, often missing | Full punctuation, paragraph breaks |
| Proofreading | No | Yes |
| Technical terms and names | Frequently mangled | Preserved via pre-processing |
| SRT export | No. Locked to YouTube | Yes. Downloadable |
| Multi-language | English only | 120+ languages |
| Off-platform use | YouTube only | Use anywhere |
| Price | Free | Free or from $4.99/mo |
YouTube auto-captions are fine for low-stakes personal content. For anything you publish professionally. Tutorials, interviews, podcasts, product demos. The accuracy gap and lack of SRT export turn a free feature into an expensive problem. Check out our AI vs human transcription comparison for more accuracy benchmarks.
Stop publishing without captions
YouTube gives you auto-captions for free. They're bad. You know they're bad. Your viewers know they're bad. The ones who rely on captions notice every mangled name and run-on sentence.
Fixing this takes five minutes. Paste your YouTube URL into DaDaScribe, wait two minutes, download the SRT file, upload it to YouTube Studio. That's the whole workflow. Try it for free (no credit card, no commitment).
YouTube gives you auto-captions for free. They're bad. Fixing them takes five minutes.
Comments & Questions
Please log in or sign up for a free account to leave a comment or question.
No comments yet. Be the first to ask a question!
Display more comments…