
You ran a perfectly good recording through Whisper and got back a transcript with a sentence that appears three times in a row. Or a paragraph of fluent nonsense where nobody was talking. Or the last ten minutes translated themselves into Portuguese for reasons nobody can explain.
The standard advice is to blame the model or switch tools. After processing thousands of files on DaDaScribe, I can tell you where the problem usually lives: in the audio you fed it, not in the engine that read it. Whisper was trained on cleaned, curated recordings. Your client sent you a phone video recorded in a cafeteria. The gap between those two things is where every artifact comes from.
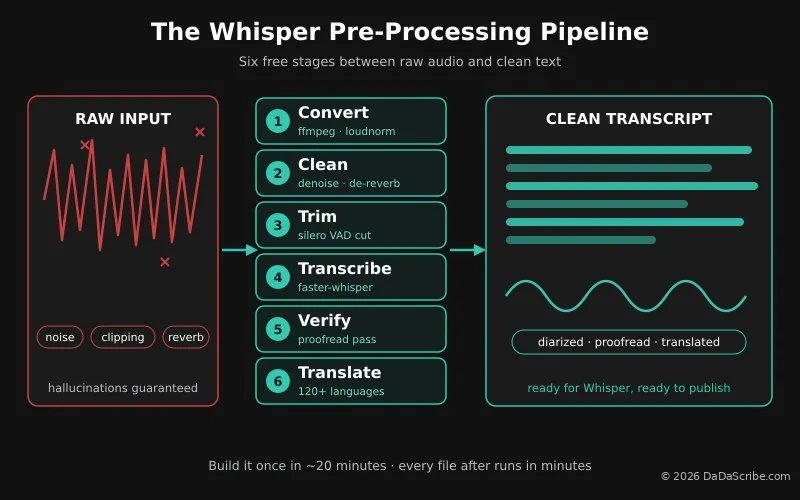
The gap is fixable, for free, in about twenty minutes of setup. This guide walks through the exact Whisper pre-processing pipeline: six stages, all free tools, no audio engineering degree required. Build it once and any file runs through it in minutes. And if you decide the manual route is not for you, the automated version appears at the end.
Why Whisper output breaks down
Four artifact types cover almost every bad Whisper transcript. Each one has a specific cause in the input audio, which means each one has a specific fix.
Hallucinated phrases. "Thanks for watching!" appearing in a business meeting recording. Sentences about subtitles or, strangely, about bears, spliced into paragraphs about quarterly revenue. These are not random. Whisper inserts them over silence, music, or long non-speech stretches: trained to expect speech, it finds nothing and invents something.
Repetition loops. The same phrase repeating until you scroll for a while. This happens mostly on long files, and it compounds: once the model starts repeating, it uses its own previous output as context, so the loop feeds itself. Long recordings with uneven pacing are the trigger.
Wrong-language output. You sent Italian, it came back in English. Or the transcript drifts between languages mid-file. Whisper auto-detects the language from the first seconds of audio, and if those seconds are noise, music, or accented speech, the guess goes sideways and takes the whole file with it.
Garbled words in noisy sections. Overlapping voices, ventilation hum, level swings between a soft speaker and a loud one. The engine mishears because a human would mishear. This is the least mysterious artifact and the one pre-processing fixes most directly.
Whisper does not fail randomly. Every artifact type maps to an input problem, and every input problem has a fix.
Stage 1: Convert and normalize with FFmpeg
FFmpeg is the free command-line workhorse of the audio/video world, available for every operating system. Two jobs happen here: getting the file into the format Whisper handles best, and evening out the volume.
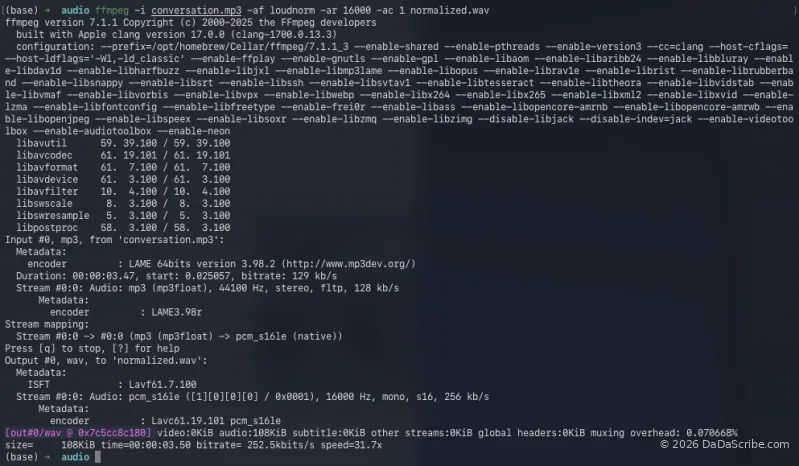
Whisper works on 16 kHz mono audio. It resamples other formats internally, but feeding it exactly what it expects removes a whole class of surprises. The conversion command is one line:
ffmpeg -i input.m4a -ar 16000 -ac 1 converted.wavVolume swings are the second problem. When one speaker sits close to the mic and another three meters away, the quiet one gets transcribed badly or dropped. Loudness normalization brings everything to a consistent target:
ffmpeg -i input.m4a -af loudnorm -ar 16000 -ac 1 normalized.wavThe loudnorm filter applies the EBU R128 broadcast standard, the same one used by television stations. Run the file through once and the soft speaker stops disappearing. This is the baseline that any serious transcription pipeline runs underneath, and it is only the start: automated systems like DaDaScribe layer a proprietary, AI-based cleanup filter on top of these steps, improving the input audio in ways that manual processing alone does not replicate.
Stage 2: Reduce noise and isolate voice
Normalization fixes volume. It does not fix noise. A projector fan and a coffee grinder are at a perfectly consistent volume, and they will still bury consonants. Automated services automate this stage; DaDaScribe goes further, applying its own AI-based audio cleanup on top of the standard pre-processing steps below.
Option A: Audacity. The free desktop editor audacityteam.org has a noise reduction tool that works in two passes. First, select a stretch of the recording that contains only the noise, maybe two seconds of room tone before anyone speaks. Open Effect > Noise Reduction and click Get Noise Profile. Then select the whole track, reopen the effect, and apply the default settings. Audacity subtracts everything that matches the profile.
After the noise reduction, apply Effect > Normalize to bring the level back up, and a gentle high-pass filter around 80 Hz to remove rumble that the noise pass missed.
Option B: no installation. Adobe Podcast Enhance is free with an Adobe account and does the whole job in one click: noise removal, echo suppression, voice isolation. A daily processing limit makes it a poor fit for high volume, but for occasional use it is the fastest zero-skill route.
One warning for both options: aggressive noise reduction can smear consonants, and smeared consonants become wrong words. Always process a copy, keep the original file untouched, and compare a minute of each version by ear before committing.
Stage 3: Trim silence and split long files
Remember that hallucinations come from silence and loops come from length. This stage removes both triggers.
In Audacity, Analyze > Label Sounds marks every silent span. Cut the dead air or export the labeled regions as separate files. Gaps longer than a few seconds are worth cutting: they are hallucination bait.
For command-line users, silero-vad is a free, open-source voice activity detector that finds every stretch of actual speech in a file. Pair it with FFmpeg to split the recording at the boundaries, and you get clean speech chunks with no dead air.
For very long files, split deliberately: anything over thirty minutes gets cut into chunks at natural boundaries, a topic change or a speaker change, not an arbitrary minute count. Transcribe the chunks separately and repetition loops lose their runway.
Stage 4: Transcribe with the right Whisper settings
Whisper's defaults are tuned for convenience, not accuracy. Four settings changes prevent most of the remaining artifacts.
Set the language explicitly. The --language flag takes an ISO code, so Italian is --language it, Japanese is --language ja. This one flag eliminates wrong-language output, because the model stops guessing. Do this even for English files with non-native speakers.
Disable context carryover. The setting --condition_on_previous_text False tells Whisper to treat each segment independently instead of conditioning on everything transcribed so far. That context carryover is exactly what turns a small error into a repetition loop. Disabling it slightly reduces consistency on clean audio and dramatically reduces loops on difficult audio, which is the trade you want.
Prime the vocabulary. The initial_prompt option takes a few dozen words that describe your recording: names, company names, technical terms, jargon. Whisper borrows spelling and word choice from the prompt, so client names and product names stop coming back mangled. Keep a small glossary per client and paste it in every time.
Pick the output you actually need. --output_format srt produces timed subtitles directly; vtt and txt cover the rest. Choosing the format at transcription time avoids a conversion step later.
If speed matters, faster-whisper and WhisperX are free, open-source Whisper implementations that run the same models considerably faster on ordinary hardware. WhisperX adds word-level timestamps and optional speaker diarization, which is the feature that labels who said what. Diarization requires a free Hugging Face account approval for the pyannote model, a one-time setup.
One habit worth more than any flag: before committing an hour of processing, transcribe a sixty-second slice from the middle of the file. Read it. Adjust. Then run the whole thing.
Sixty seconds of testing on a slice from the middle of the file tells you more than an hour of full-length regret.
Stage 5: Clean the Whisper transcript before you use it
Even a good run produces errors, and this is the pass that separates a usable transcript from a professional one.
Read the transcript against the audio at 1.5x speed. You are hunting for three things: sentences that appear where nobody spoke, which are hallucinations to delete; names and numbers to verify against the audio; and obvious mishears that a glossary would have caught.
If the output is an SRT file, Subtitle Edit is the free standard for fixing it: it shows timing and text together, lets you shift or split cues, and reports reading-speed problems, which matter the moment these subtitles meet an actual viewer.
This stage matters double if a translation is coming. Whatever errors survive in the source text get carried into the translation and amplified. Ten minutes of verification here saves an hour of explaining to a client why the transcript says the opposite of what the speaker said.
Stage 6: Translate the verified transcript
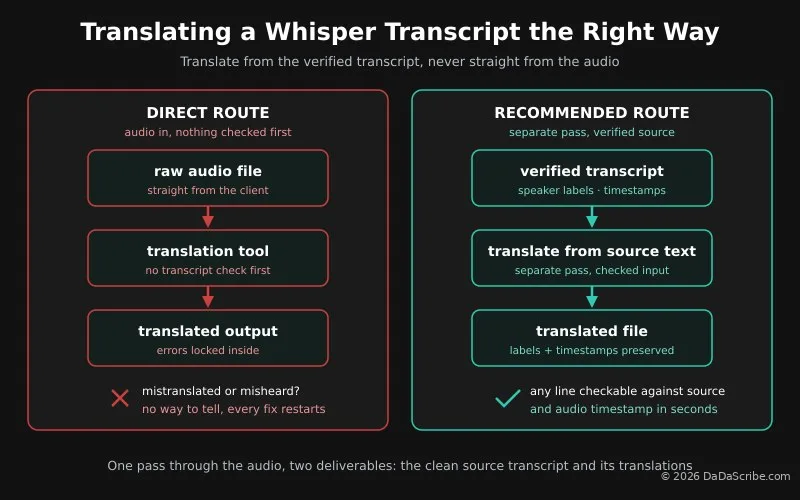
Keep translation as a separate pass, and translate from the cleaned source text you just verified, not straight from the audio.
The direct route, feeding audio to a tool that outputs a translation, has a structural flaw: nobody checked what the machine heard before it translated. When a sentence comes back wrong, you cannot tell whether it was mistranslated or misheard, and both fixes require starting over. With a verified transcript in hand, any questionable translation can be checked against the source text, and against the audio at that timestamp, in seconds.
Speaker labels and timestamps are your anchors here. Carry them into the translated file, and every translated paragraph maps back to a specific spoken moment. That mapping is what makes a translated transcript auditable, and auditable is what clients pay for.
For translators, there is a bonus: the clean source transcript is usually a deliverable in its own right. Build the pipeline this way and one pass through the audio produces both outputs.
What automated Whisper pre-processing produces
That is the pipeline. Six stages, all free, and after the first build it runs in minutes per file. Build it once anyway, because afterward you will know exactly what automated systems do for you.
Here is what the same job looks like when the pipeline runs itself. Our demo page includes a two-and-a-half hour episode of the Lex Fridman Podcast with Greg Lukianoff, transcribed and translated into four languages: English, French, Italian, Portuguese, and Spanish. Total processing time, nineteen minutes and thirty-nine seconds. The transcript, with speaker turns intact, plus all four translations, are readable on the page.
That single demo covers every stage this guide describes by hand: pre-processing, transcription, diarization, and four translation outputs, with no FFmpeg commands involved. The DaDaScribe demos page has more examples with source languages, processing times, and outputs shown for each.
DIY pipeline versus automated transcription
| Raw Whisper | DIY free pipeline | DaDaScribe | |
|---|---|---|---|
| Cost | Free | Free | Free 10-minute demo; plans from $4.99/mo for 3 hrs |
| Setup | None | 1-2 hours the first time, faster after | None |
| Pre-processing | None | Manual, per file, skill-dependent | Automatic on every upload |
| Hallucination handling | You debug it | Silence trimming plus settings | Handled in the pipeline |
| Speaker labels | Partial, setup required | Via WhisperX plus pyannote setup | Built in |
| Translation | Not included | Separate pass, manual | Built in, 120+ languages |
| Your time per file | Debugging | 20-40 minutes hands-on | Minutes, hands-off |
The DIY route wins in three cases: you want full control of every parameter, you process audio constantly enough that the setup amortizes to zero, or the audio never leaves your machine for privacy reasons. That last one is legitimate, and no automated service should pretend otherwise.
When the automated route wins: deadline work, mixed or unfamiliar languages, files with poor audio you cannot re-record, and any job where the twenty minutes of manual cleanup per file costs more than a plan. DaDaScribe runs the pre-processing automatically, adds automatic proofreading, and sends the transcript and SRT by email when processing finishes. If you want the reasoning behind why cleanup changes accuracy so much, our guide on fixing noisy interview transcripts covers the mechanics.
The DIY pipeline teaches you what the work actually is. The automated pipeline is what the work looks like when it is done for you.
Pro tips for demanding audio
Keep a glossary per client. Ten terms is enough: names, product names, recurring jargon. Paste it into initial_prompt on every job. It removes the most embarrassing error class: misspelled client names in a delivered file.
Normalize loudness before batching. Batch processing just means running several files through the pipeline in one go. Normalize every file to the same loudness target first, and quality stays consistent across the whole project instead of varying file by file.
Always set the language flag on accented or non-English audio. Auto-detect is the single most common cause of wrong-language output, and it costs one flag to prevent.
Know when to ask for a re-record. If you cannot understand a word yourself after full cleanup, the model will not either. A polite email asking the client to re-record ten minutes of audio beats two hours of forensic reconstruction.
Verify translations against the source, never the reverse. If a translated sentence looks wrong, check the source transcript and the audio, in that order. Chasing errors directly in the translation wastes time, because the error is usually upstream.
And when your cleaned transcript is headed for video, our walkthrough on adding captions to YouTube videos in under 5 minutes picks up exactly where this pipeline leaves off.
Try it on your worst file
The pipeline is built. Here is how to find out whether it is worth your time, in either direction.
Take the worst recording in your inbox, the one with the cafeteria noise or the repetition loop. Run it through the six stages and read what comes back. Then run the same file through the free 10-minute demo at dadascribe.com and compare the outputs, including the amount of your afternoon each one consumed.
If you go the automated route, everything in this guide happens before the transcription engine runs: the audio gets cleaned, normalized, and isolated automatically, the transcript arrives proofread with SRT subtitles and speaker labels, and translations into more than 120 languages are one setting away. Plans start at $4.99 per month for 3 hours, extra time is available anytime, and subscriptions cancel whenever you want.
Either way, the fix for that file already exists. It is twenty minutes of pipeline or one upload, and it starts with deciding which of those you would rather spend your week on.
Comments & Questions
Please log in or sign up for a free account to leave a comment or question.
No comments yet. Be the first to ask a question!
Display more comments…